
Homemade wedding cards. DIY wedding cards: master classes, interesting ideas
Brides spend their entire lives thinking about the day of their upcoming wedding. Thoughts become especially relevant on the eve of a wedding celebration. Future wives think through in detail how the celebration will take place, and then prepare, tirelessly before this day, in order to realize the desired moments.
Finding a photographer, choosing a dress, developing designs for invitations - everything needs to be thought about. Head spin. Speaking of postcards, there are two ways to purchase them. By contacting the girls, whom we will call code “Very Skillful Hands,” you have the opportunity to buy ready-made cards for your wedding.
In addition, invitations can be found in stores, both online and offline. But there is a second scenario. More and more often, brides are striving to make invitations with their own hands, on their own, putting their soul into it. As they say: “If you want it done well, cook it yourself.” With my own hands.

Create an invitation
List of materials:
- a sheet of thick paper - one of them is plain colored, the other has a pattern;
- a sheet of white paper (copier);
- artificial flower (quantity as desired, minimum 2);
- thin ribbon needed for the bow;
- scissors: regular and curly;
- glue (preferably PVA);
- thread, needle;
- beads;
- Printer;
- optional: gel pens;
- lace braid.
Step-by-step instruction
- Taking a plain colored sheet, cutting off 1.5 cm from one of the edges (do not throw away this strip), divide the remaining part equally.
- Armed with a colored leaf, cut into rectangular pieces with scissors, shaping the edges using curly ones. At your disposal will be the most interesting stripes with zigzag edges.
- Ribbon, its time has come. Having folded it into a bow, leaving one of the ends shorter than the other, using a paper clip, thread the “structure” obtained in the previous step onto it.
- The flower needs to be attached to the bow using a thread and then sewing on a bead.
- Cut off the petals of the second flower. Glue them to the “relative” located on the tape. Voila, for your attention a stunning, magnificent seven-flowered flower.
- Using a printer, you need to print the names of the bride and groom on a xerox sheet. Being the owner of beautiful handwriting and being able to write in calligraphy, show off your own talent right now.
- Having cut out the text from step No. 6 in the shape of a strip with curly edges, paste them onto the one that remained earlier, 1.5 cm wide.
- Returning to the blank created from colored paper, fold it. One of the edges should extend beyond the edges of the card.
- Glue the lace trim to the “protruding” edge using glue.
- It's time to write down the text of the invitation. Words can be printed or handwritten. Then you need to beautifully cut out the paragraphs from the paper using curly scissors.
- Glue the invitation text using glue to the inside of the card.
- The most crucial moment. It is necessary to decorate the main, outer side of the postcard. Take a strip of colored paper that has a shaped edge, then glue it slightly below the intended center line of the invitation.
- You need to carefully glue a flower and a bow onto the strip with the pattern, and the names on top.
- Enjoy!
You have received a wedding invitation card that will look much better than one bought in a store: it is made with soul and with your own hands. It’s not a sin to present one to valuable guests whom you would like to see at your wedding.
The number of cards must correspond to the number of invitees.
Creating a postcard for newlyweds
In principle, you can also make a postcard for newlyweds with your own hands. Such a wedding card should be gentle, inside you will have the opportunity to scribble a couple of lines dedicated to the spouses.
The technique that will be used in creation is called quilling. There is a kit that contains everything you need for such creativity to “get creative” with your own hands.
List of materials:
- One piece of thick white paper;
- sheet of xerox paper. It will be cut and also created into rolls. By purchasing a special quilling kit, you will see that the work will go much more quickly;
- a colored sheet of paper, which is useful for the scrapbooking technique. You can also purchase a ready-made set to create using the scrapbooking technique;
- satin ribbon;
- beads that need to be cut in half. They are often used to create scrap;
- scissors;
- ruler (20+ cm);
- scissors;
- a simple pencil;
- (stationery knife;
- glue, preferably PVA;
- a special tool for quilling (can be replaced with a clean toothpick or a refill from an unusable ballpoint pen). If you buy a set there will be no problems.
If possible, be sure to purchase a set necessary for creativity using the quilling technique, because it will make your work much easier and it will be much easier to create a postcard with your own hands.
- Using scissors, make a rectangle (20x15 cm) from thick paper. Then fold it over to create two equal pieces.
- Follow the steps described above with the colored rectangle that you need to talk about scrap. Other size: 9.5x14.5 cm.
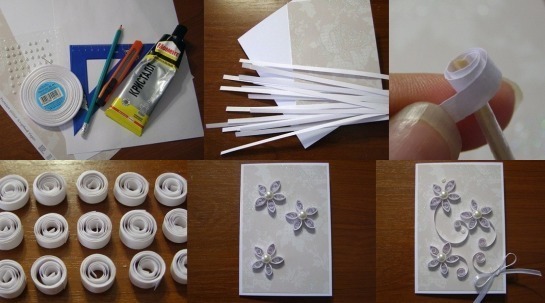
- Armed with photocopier paper, cut strips to create flowers. Make at least 14 strips.
- Using the quilling tool found in the kit or a toothpick, roll up the strips obtained in the previous step. Remember that they need to be wound tightly, fixing one of the edges with glue.
- After removing the structure from a toothpick or rod (or a tool you find after purchasing a set), fix the free edge with PVA. This will prevent the rolls from unwinding.
- Taking a snow-white piece of paper that serves as the basis for the postcard, glue it onto colored paper that has a rectangular shape.
- Create petals from the rolls with your own hands. You will achieve this by flattening them with your fingers, creating buds. Glue to the card.
- The bead halves must be glued into the cores of the buds.
- The composition must be decorated using spirals. You will get them by unwinding the rolls and adding small beads.
- Add some flair by adding a twisted ribbon bow.
- Fine!
Scrapbooking, quilling, a million different techniques... There is nothing complicated in creating cards related to the wedding day: invitations for guests and congratulations for the newlyweds. All you need is a few consumables, neatness and patience.
Today in stores, markets, and post offices you can see thousands of options for a wide variety of postcards for one or another occasion. Including wedding cards. But the celebration associated with the most important day in the life of the bride and groom is more than a banal holiday on the calendar. A DIY wedding card will become a real work of art if you use a little imagination and use beautiful materials. Below is a more detailed MK.
I want to continue my wedding day as long as possible. Preparations for it bring a lot of pleasure, the groom and the roost experience many pleasant emotions, just like many of the guests.
So, instead of buying a wedding card as a gift for the celebration, why not make it yourself? This also applies to greeting cards. You can put a piece of your soul into a small piece of cardboard; as a result, the bride and groom will keep it in a wedding album. And the template for the bottom of the store will simply go into the trash just like a lot of other unnecessary things.

Subjects
Greeting cards can be made large, voluminous and memorable. A lot of time and imagination is spent on them. How to make your own invitations? After all, the process will take a significant amount of time. This article will provide a master class that will allow you to make your own invitations, wedding items and money cards. If desired, the groom can also join the process by adding a little creativity to the style of the cards. Techniques such as quilling and scrapbooking will be used. MK will help even beginners cope with the work.

Gift option
The product is intended to become a rarity. Making it will require investment: a handmade souvenir should be a gift in itself. But you can make it with a compartment for money or a small pocket for jewelry. Then the bride and groom will definitely associate a beautiful handmade card only with pleasant impressions. A postcard can be of considerable size and contain many handmade elements. It’s not difficult to make a product that will become a masterpiece, but the results will definitely justify themselves.

Invitation cards
Now the heroes of the occasion need to try. The groom can also contribute to the process of creating greeting cards, especially if there are a lot of guests. To create postcards, you can take one template and change only a few elements.
For example, men will receive invitations with blue ribbons, and women will receive invitations with red ones. There are a lot of options for imagination.

Basic Techniques
To make a handmade card, you will have to master a simple technique for creating them - scrapbooking. MK will be described below. Quilling, a method of creating various decorative elements using narrow paper strips, will also help in creating the product. Quilling kits have everything you need to create a handmade work of art. There you can also find a master class on working with the material and the template you need.

Scrapbooking when creating postcards (MK)
Essentially, scrapbooking is pieces of memories collected on a piece of paper. If you watch a master class on creating products using this technique, you will be convinced that lace, clippings from other printed cards, buttons, artificial and dried flowers, and many other little things will be useful for making handmade cards.
The main thing is to put everything together harmoniously, using only beautiful things that will help create a festive atmosphere.

Scrapbooking is gaining wide popularity among those who like to do something with their own hands. You can find scrapbooking kits in art and stationery stores; most of them also provide a master class on how to work with them. You can also use individual elements; scrapbooking opens up wide possibilities for creativity.
Such decorative materials are suitable
- lace;
- beads;
- photo clippings;
- cardboard photo frames with embossing;
- beautiful herbariums;
- artificial flowers;
- doll dresses.

By the way, a small dress from a doll can be cut in half lengthwise, and the front part can be glued to the postcard. The result will be a bride's dress. You can do the same with the groom's suit. Scrapbooking also prescribes this use of scrap materials.
We use embossed cardboard, sold in stationery stores, or velvet cardboard as a basis; inside the card you can make a pocket for money from a wide silk or velvet ribbon. You can buy it together with MK.

Small compartments for money are a separate topic for creativity. They can be made of lace, leather, decorative money, or you can glue a ready-made small envelope inside. Invitation cards using the scrapbooking technique can be made small, but very impressive. For example, they may have small bouquets of artificial flowers, which can be made from ready-made material. We use frames made of embossed cardboard, inside which an invitation will be written manually for each individual guest.
To make your work easier, stamped leaves can be ordered from a printing house, and they can be pasted onto the invitations. Scrapbooking perfectly complements the quilling technique.

Quilling (MK)
A detailed master class on working with the quilling technique can be found online. But the basics of MK, as a rule, are provided in the creativity kits themselves.
Here are popular options for postcards that you can make using the quilling technique with your own hands:
- two white birds sitting on a branch on a red background;
- blue and pink heart made of small flowers;
- soft blue heart on a beige background using silk ribbon;
- wedding bouquet of many multi-colored or white large flowers.

Quilling opens up great opportunities for creating beautiful works; making them is quite simple; a master class will help beginners. Once you become familiar with the basic elements and techniques, the master class will no longer be needed, and you can make a custom postcard in literally a matter of minutes.

Use your imagination, invest a little soul, and you will be able to contribute to the creation of a unique, unforgettable holiday for two lovers.
Video gallery
Photo gallery


A wedding celebration is an event that everyone looks forward to: the newlyweds themselves, their relatives and friends. Relatives of newlyweds, as a rule, spend a lot of time choosing a gift, a holiday bouquet and a postcard where they write wishes to the newlyweds. Not a single congratulation is complete without the last thing, and therefore the invited people always go to specialized stores in search of it. An alternative to this is making an original postcard with your own hands. Let's figure out how to make a greeting card yourself.
How to make a beautiful wedding card with your own hands?
If you decide to make a card for the newlyweds with your own hands, there is no doubt that it will be treasured by the newlyweds, because such gifts are valued much more than purchased ones. Thick paper or cardboard is used as its base and decorated using a variety of techniques - scrapbooking, quilling. Decorate a wedding card with rhinestones, beads, ribbons, lace, dried or artificial flowers, drawings, patterns. The master classes below will help you create an original product that the heroes of the occasion will love.

Greeting card using quilling technique
Quilling or “paper rolling” is a technique used in many areas of needlework. Craftsmen create greeting cards by folding and rolling narrow strips of paper. They are also used to make photo frames, albums, jewelry, and paintings. Thanks to a large selection of paper of different colors and weights, you can easily find materials that are ideal for designing a wedding card.
Necessary materials
- A sheet of thick white paper (or another light shade).
- Sheets of thin paper that will be needed for rolling the “rolls”. You can use special quilling kits, which include the original material, already cut into thin strips. In this case, the postcard making process will go much faster.
- Scrapbooking paper with patterns or designs that match the color.
- Satin ribbons.
- Beads pre-cut into halves.
- Pencil.
- Scissors.
- Ruler.
- Stationery or other knife.
- Paper rolling tool. This part can be replaced by toothpicks, matches, and empty ballpoint pens.
Stages of creation


Happy wedding day card using scrapbooking technique
Greeting cards made using the scrapbooking technique turn out cute, airy and touching. Such cards can be minimalistic, using only two or three colors and a small number of decorative elements. It is extremely important for scrapbooking to correctly combine shades, patterns and designs on scrap paper so that the finished product does not turn out to be too tacky. The harmonious selection of details of such a postcard guarantees its magnificent appearance.
Necessary materials
- Thick paper or sheet of cardboard (A4 format).
- Two sheets of scrapbooking paper, matching colors.
- Stationery knife.
- Scissors (curly ones can be used for edges).
- Ruler.
- Double sided tape.
- Glue.
- Lace.
- White satin ribbon.
- A decorative “bouquet” that must first be made independently or purchased in a specialized store.
- A small printout with the inscription “Happy Wedding Day!”
- Halves of pearl beads.
Stages of creation


Postcard in the form of an envelope for money
An excellent gift for newly-made spouses is money. Newlyweds have a lot of expenses at the beginning of their married life. There are many options for wedding cash envelopes on the shelves of souvenir shops, but it’s even better to make such a thing yourself. In addition to the gift amount, guests can include a card with congratulations. Let's look at how to make a wedding envelope using scrap paper, satin ribbons and other beautiful decorative elements.
Necessary materials
- Double-sided scrapbooking paper with a matching design.
- Creasing tool.
- Mat, cutter.
- Satin ribbon (organza ribbon will do).
- Curb hole punch (stationery knife).
- Glue.
- Double sided tape.
- Decorations.
Stages of creation


DIY wedding card ideas
When making a wedding card yourself, you can safely experiment with shape, size, and colors. The main thing is that all elements of the greeting card look appropriate and harmoniously combine with each other. Rectangular, square, round cards, products in the shape of a heart or two doves look good. Check out the photos below for some fun wedding card design ideas.
In the form of a bride and groom's outfit
Decorating a wedding greeting card with the outfits of the bride and groom is a cool and unusual idea that the newlyweds will definitely like. To make such a product, paper, satin, lace, chiffon fabrics, various beads, decorative flowers, and quilling rolls can be used. Two gold rings will look good.

Heart shaped
The heart shape is perfect for making a wedding card. This is a symbol of sincere love between spouses. The greeting card can be created in the shape of a heart, decorated with one or more such elements. This version of the card will look good in red or any other color that matches the theme of the celebration.

Bouquet of flowers
Delicate flowers are an excellent solution for decorating a wedding card. This could be a small bouquet, as in the master class above, or a real “flower meadow”. As decorative elements you can use natural dried flowers, artificial plants, paper elements, flowers made of polymer clay, fabric or plastic.

Video: master class on making a wedding card
Creating a wedding card for newlyweds is a fascinating process that will bring pleasure to the giver, and subsequently pleasant emotions to the newlyweds. To make a truly beautiful greeting card and not miss anything, watch the video master class below with detailed step-by-step instructions. The presenters will help you create an elegant beige and snow-white card using thick paper for the base, elegant lace, satin hearts, a voluminous butterfly painted with gold paint, ribbon and a small piece of paper with an inscription for decoration.
If you want to pleasantly surprise your newlyweds by giving them an exclusive card, try making it yourself.
Such a thing will be a very nice surprise and beautiful. Surely, it will be stored for many years in a secluded place, and every time they take it out, the couple will remember this unforgettable day in their lives with a smile.
Of course, you can buy a postcard, since the choice is huge, there are also very interesting designer pieces, but will it really be unique, one of a kind?
Try it yourself and don’t be afraid to experiment when creating your first masterpiece.
DIY wedding cards: where to start?
What you will need for a DIY wedding card:
Creating a postcard begins with purchasing everything you need. You need to choose a base for your work of art, this can be cardboard or thick embossed paper.
To decorate cards, various decor is used: ribbons, sequins, lace, rhinestones, beads, beads, braid, dried flowers and leaves. And, of course, you will need scissors, glue, and a stationery knife. Well, then everything depends only on your imagination.
DIY wedding card using quilling technique
Without much experience in creating postcards, you can start with the simplest.
DIY wedding card: what will you need?
- white thick paper for the base;
- white thin paper for rolls;
- colored paper for scrapbooking (such paper is sold in office supply stores);
- satin ribbon;
- halves of beads;
- a special quilling tool can be replaced with empty ballpoint pen refills;
- glue, scissors, pencil, ruler.
DIY wedding card using quilling technique: instructions
Making your own wedding card using the quilling technique is quite easy. It won't take you much time.
How to make a DIY wedding card using the quilling technique?
- We cut out the base for the postcard from thick paper - a rectangle measuring 20 x 15 cm. Fold it in half.
- Cut out a rectangle measuring 9.5 x 14.5 cm from colored paper and glue it to the “front” of the postcard.
- Cut 14-16 strips of thin paper for flowers.
- We tightly roll the strips into rolls using a pen or a special quilling tool.
- Remove the rolls and secure the free end with glue.
- We make petals from the rolls by flattening them with our fingers.
- Glue the flowers to the card.
- Glue beads into the core.
- We decorate the card with spirals of untwisted rolls and beads.
- Add a satin bow.
DIY wedding cards: choosing an option
Perhaps you will find something interesting for yourself in our articles.

Using beautiful textured patterned paper, velvet or silk ribbons, flowers and beads, you can create stylish DIY wedding cards.
- What documents should an individual entrepreneur have?
- Accounting for individual entrepreneurs - rules and features of independent reporting under different tax regimes Primary documentation for individual entrepreneurs
- Accounting for individual entrepreneurs: features of accounting in individual entrepreneurs?
- How to privatize an apartment, everything about privatization List of documents for privatization of an apartment